Introduction
Kotlin is a modern language with a self-explanatory and concise syntax; it can be the future language of Android development. Building an Android app with kotlin is very easy and simple.
Over the last few years, the demand for cross-platform app studio increased tremendously, as a response to the amplified demand of users, Kotlin, a Jet Brain designed language was announced as one of the official languages of the Android Studio since the Google I/O that took place in 2017.
Although, due to the wide developers’ community of Java it still remains deep-rooted in the Application development industry and Google has preserved it efficiently in the Android Studio. Kotlin has a few additional advantages over Java as it is a statically typed programming language that is triggered on the Java virtual machine and is totally backward interoperable with its predecessor – the Java programming language.
Kotlin comes in with type inference; this implies that code is written in short-hand without unimportant braces and function declarations.
Learn how to Advanced Coroutines with Kotlin Flow & LiveData with Coding Ninjas.
Analogous to Java, Kotlin also supports the numerous Java class libraries and Gradle scripts. Furthermore, Kotlin includes a wide range of safe and secure functions for asynchronous operations because of its highly capable suspending function.
Therefore, you must have hands-on knowledge of Kotlin because very gradually, yet soon the Android Studio will be migrated to Kotlin to facilitate cross-platform development.
Pre-requisites for using the Android Studio:
- The developer should have hands-on knowledge about object-oriented concepts such as classes, interfaces, inheritance, objects, abstraction, polymorphism, and so on.
- The developer is assumed to have a commendable practical knowledge about either Java or Kotlin.
- The developer must be familiar with the various XML attributes.
The developer must have an immaculate concept about file reading paradigms. - The developer should have pre-installed productivity tools such as CloudApp, GitHub, Source Tree, Meld, Trello and so on.
Learn about the difference between features of Kotlin & Kotlinx.
Steps for creating your first App using Kotlin
Step Zero: Install the Android Studio
Check the system requirement list given below:
Windows OS
- Microsoft® Windows® 7/8/10 (64-bit)
- 4 GB RAM minimum, 8 GB RAM recommended
- 2 GB of available disk space minimum
- 4 GB Recommended (500 MB for IDE + 1.5 GB for Android SDK and emulator system image)
- 1280 x 800 minimum screen resolution
Linux OS/GNOME or KDE desktop
- Tested on gLinux based on Debian.
- 64-bit distribution capable of running 32-bit applications
- GNU C Library (glibc) 2.19 or later
- 4 GB RAM minimum, 8 GB RAM recommended
- 2 GB of available disk space minimum,
- 4 GB Recommended (500 MB for IDE + 1.5 GB for Android SDK and emulator system image)
- 1280 x 800 minimum screen resolution
Mac OS
- Mac® OS X® 10.10 (Yosemite) or higher, up to 10.14 (macOS Mojave)
- 4 GB RAM minimum, 8 GB RAM recommended
- 2 GB of available disk space minimum,
- 4 GB Recommended (500 MB for IDE + 1.5 GB for Android SDK and emulator system image)
- 1280 x 800 minimum screen resolution
In case your system meets the system requirements mentioned above, go to the official site of Android Studio by clicking on the link and set-up the integrated development environment. In contrast to web development, the entire process of app development is carried out at this single stop.
It comes with a wide range of app development tools, from the code editor to the emulator required for testing the app. If you are working on a 64-bit Windows OS then simply click on the Download button, else click on “Download Options” for viewing the versions of Android Studio compatible with other operating systems.
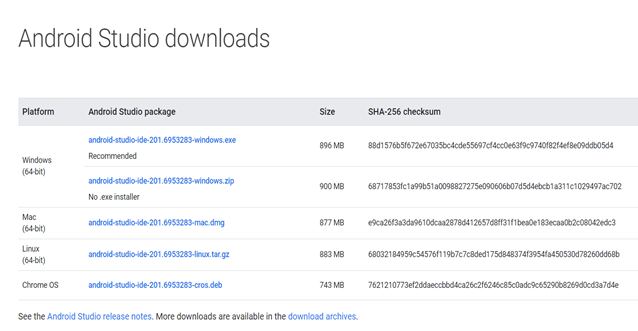
Image Source: developer.android.com
Step One: Create a new Android Project & Select the template
After successful installation of it, when you open it, you will see the following welcome screen:
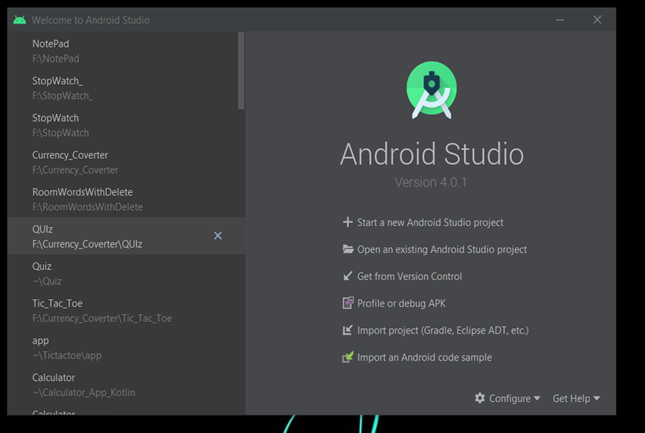
Click on the “Start a new Android Project” option from the page. You will be navigated to the “Select a Project Template” page. There are numerous kinds of project templates within the Android Studio such as Empty activity, Login activity, Bottom Navigation activity, Map activity and so on.
You only add one activity to your project from this page, later you can add more activities by using the “New” button in the Android Studio.

After selecting the template, click on the Next button to proceed further.
Step Two: Rename the Application & select the language
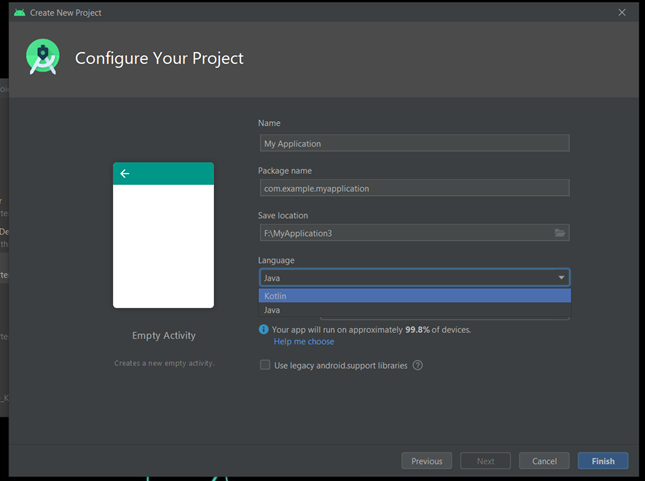
By default, the application name comes as “MyApplication”, you can alter it by editing the text under the “Name” section of the “Configure your project” page. The storage location of the Project on your local disk drive can also be altered here.
To select the app language as Kotlin, select Kotlin from the language spinner given in the languages tab. Once you have made all the amendments, click on the Finish button.
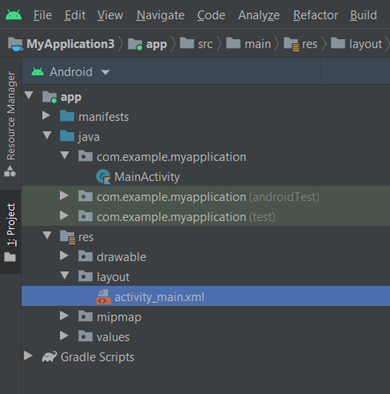
Step Three: Create the user-interface using XML
For creating the user-interface you need to write the XML (Extensible Markup Language) code in the activity_main.xml file. Therefore, it is recommended to have hands-on knowledge about the XML attributes and tags before getting I into the Android Studio. You can locate the file at res directory > layout directory > activity_main.xml.
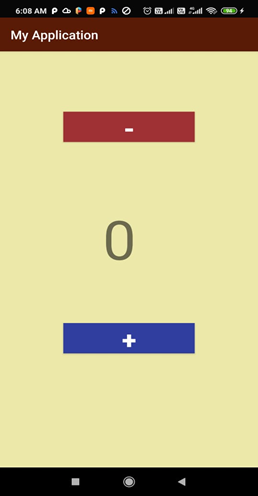
To start with you can create an elementary app like a COUNTER. The UI design consists of the following components:
- One increment button for increasing the count.
- One decrement button for decreasing the count.
- One textView for displaying the value of the count variable.
The complete XML code for the above shown UI design:
<?xml version="1.0" encoding="utf-8"?>
<LinearLayout
    xmlns:android="http://schemas.android.com/apk/res/android"
    xmlns:app="http://schemas.android.com/apk/res-auto"
    xmlns:tools="http://schemas.android.com/tools"
    android:layout_width="match_parent"
    android:layout_height="match_parent"
    android:orientation="vertical"
    android:layout_gravity="center_vertical"
    android:background="#ECE8A9"
    tools:context=".MainActivity">
    <Button
        android:id="@+id/minus"
        android:layout_width="200dp"
        android:layout_marginTop="200dp"
        android:layout_height="50dp"
        android:layout_gravity="center_horizontal"
        android:background="#9F3034"
        android:textSize="40dp"
        android:textStyle="bold"
        android:textColor="#FFFFFF"
        android:text="-" />

    <TextView
        android:id="@+id/display_count"
        android:layout_width="80dp"
        android:layout_marginTop="100dp"
        android:layout_height="100dp"
        android:layout_gravity="center_horizontal"
        android:text="0"
        android:textSize="90dp" />


    <Button
        android:id="@+id/plus"
        android:layout_width="200dp"
        android:layout_marginTop="100dp"
        android:layout_height="50dp"
        android:layout_gravity="center_horizontal"
        android:background="#303F9F"
        android:textSize="40dp"
        android:textStyle="bold"
        android:textColor="#FFFFFF"
        android:text="+" />


</LinearLayout>
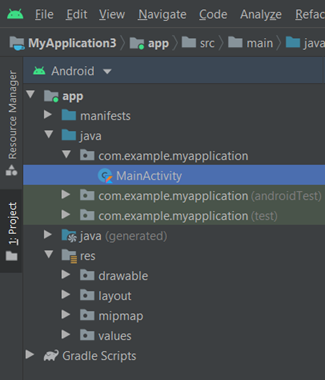
Step Four: Write the Kotlin Class code for the App
After creating the UI design, you can sync the view objects variables using their id with their Kotlin. Go to the Java folder > Select the package > Write the code in the MainActivity.kt file. For storing the current count we create a count variable. Later, we use two buttons plus and minus for increasing and decreasing the count respectively. You have to call the setOnClickListeber on the button for carrying out the increment and decrement operations and the setText method on the TextView to display the value of the current count.
Shrinking Kotlin libraries & apps using Reflection with R8 can be done very easily, read the blog to know more
The complete Kotlin Class code for a Counter App:
package com.example.myapplication
import androidx.appcompat.app.AppCompatActivity
import android.os.Bundle
import kotlinx.android.synthetic.main.activity_main.*


class MainActivity : AppCompatActivity() {
    var count = 0;
    override fun onCreate(savedInstanceState: Bundle?) {
        super.onCreate(savedInstanceState)
        setContentView(R.layout.activity_main)
        display_count.setText("" + count)

        plus.setOnClickListener {
            display_count.setText("" + ++count)
        }

        minus.setOnClickListener {
            display_count.setText("" + --count)
        }
    }
}
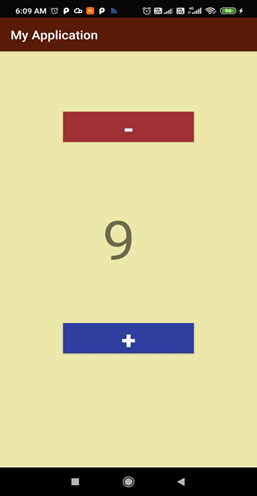
Step Five: Install the Android Emulator & Test the App
Considering the availability associated with the testing of apps intangible devices, Android Studio comes with an emulator that can be configured to any of the existing operating systems of it.
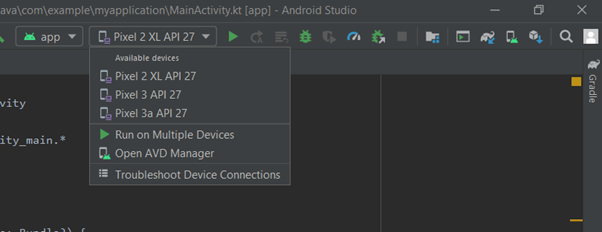
You can install multiple kinds of AVD (Android Virtual Device) using the AVD Manager tab of the AS. You can even access the camera, storage, and other external features in the Android Virtual Device.
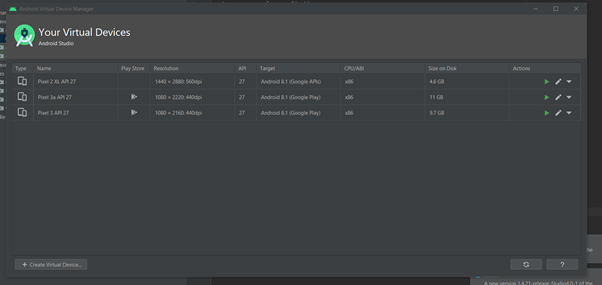
The AV device even comes with the feature of capturing live screenshots, increasing or decreasing the volume, rotating the screen to portrait and landscape mode while the app is running, to allow efficient testing. With every update of the Android Studio, more features are being added to the emulator to create a more efficient emulator.
Here are the 5 Best server-side Kotlin frameworks that can be used for building an app.

Analyse the app results on the Android Emulator, usually, if there is any error it is displayed in the Error tab of the Android Logcat. You can scroll through the error tab to note down the errors and the comments issued by the back stack-trace of the Android Emulator.
For efficient testing of the app, run it on physical Android devices with distinct Android versions as in KitKat, Lollipop, Jellybean, Oreo, and so on. Many a time, there are certain libraries that get depreciated in the newer versions of Android or are unavailable in the older versions, this leads to crashing of the app. Therefore, you need to test your app in almost all the versions of Android, to give accurate testing results.
Try to create an app from distinct journals such as database management apps for banking software, blood bank management, and multimedia apps such as music players, games, photo scanner or voice recogniser. The more you explore, the more you grow. If you stumble across anything, you can post your queries in the Android Developers’ community, which is remarkably widespread as the densest and active community of the current tech-era.
If you liked reading the article, you will surely like our programming courses.
By Vanshika Singolia


